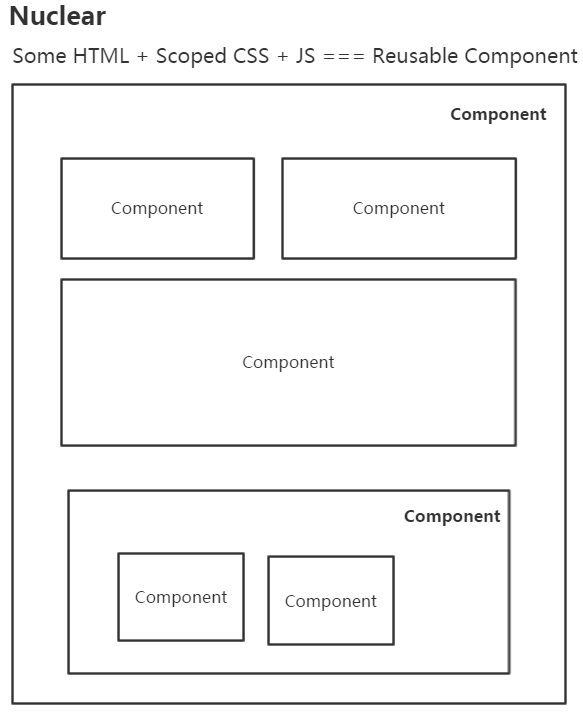
目前来看,团队内部前端项目已全面实施组件化开发。组件化的好处太多,如:按需加载、可复用、易维护、可扩展、少挖坑、不改组件代码直接切成服务器端渲染(如Nuclear组件化可以做到,大家叫同构)…
怎么做到这么强大的优势,来回忆下以前见过的坑,或者现有项目里的坑。
CSS层叠样式?保佑不要污染别的HTML!
在web前端,一般一个组件必须要有骨架HTML和装饰的CSS以及JS逻辑。而CSS要是可以是局部作用域那就再好不过了!就不用写长长的前缀了,浪费带宽不说,而且费劲。
如
.ui-popup-arrow-xx-xxxxx-xxxx-container{

}
这回够长了吧,不会污染别的HTML了吧。真的太长了,没有办法,因为CSS不是局部的,怕污染其他的HTML,规划好长长的namespace、module是以前的最佳实践。
怎么优雅绑定事件?只能定义在window下?
如果HTML绑定的事件是局部作用域那就再好不过了!我真的见过模版代码里出现下面的代码:
<div onclick="xxx()"></div>然后在js里找到了下面的代码:
<script>
    window.xxx=function(){

    }
</script>
要绑定的事件一多,得污染多少全局变量啊。所以还有的工程师这么干:
<div onclick="ns.xxx()"></div>
<div onclick="ns.xxxx()"></div>
然后在js里找到了下面的代码:
<script>
    window.ns={};

    ns.xx=function(){

    }

    ns.xxx=function(){

    }
</script>
这里貌似比不设定namespace好很多,但是还是妥协的结果。一般希望能封装成组件,组件的HTML里绑定的事件就是组件内定义的事件,内聚内聚!!
通过js动态绑定事件的坏处我以前专门写了一篇文章来阐述,主要是lazy bind会导致用户看到了页面,但是页面确无法响应用户的交互,这里不再阐述。
需求变更?找不到在哪改代码?
大型项目如游戏什么的为啥都是面向对象式的写法?如果一个组件刚好又能是一个Class那就再好不过,Class base可以更方便地抽象现实世界的物体及其属性或者逻辑算法,所以甚至有些编程语言都是面向对象的(这里逆向逻辑),如JAVA、C#…整体过程式的代码对于大型项目几乎没法维护(如基于jQuery就能容易写出整体都是过程式的组织结构),整体OO,局部过程式是可以接受的。
组件需要嵌套?只能复制粘贴原组件?
扁平无嵌套组件还是比较简单,对模板的字符串处理下,把绑定的事件全指向组件自身定义的方法,生命周期也好处理。在真正的业务里经常需要组件嵌套,这样也更利于复用。虽然大量模板引擎支持引用子模板、共享数据等,但是组件是有生命周期的,模板嵌套不能真正解决组件嵌套的问题。能支持组件嵌套并且声明式嵌套就那就再好不过了!
数据变了?重新生成HTML替换一下?
怎么替换?先查找dom?什么?你还在查找dom?你还在背诵CSS选择器?替换一下?不能增量更新吗?或者diff一下吧?不要每次全部替换啊!
首屏太慢?以前抽象的组件没法复用?
什么?首屏太慢?改成直出(服务器渲染)?以前代码没法复用?要推翻重写?什么?怎么搞?排期?产品不给排期?需求没变为什么要给排期?
下面来看下Nuclear怎么解决上面问题。
install Nuclear
npm install alloynuclearHello,Nuclear!
varHelloNuclear=Nuclear.create({
    render:function(){
        return'<div>Hello , {{name}} !</div>';
    }
})

newHelloNuclear({name:"Nuclear"},"body");
内置了mustache.js无逻辑模板。
事件绑定
varEventDemo=Nuclear.create({
    clickHandler:function(evt,target,other1,other2){
        //MouseEvent {isTrusted: true, screenX: 51, screenY: 87, clientX: 51, clientY: 21…}
        console.log(evt);
        //<div onclick="Nuclear.instances[0].clickHandler(event,this,'otherParameter1','otherParameter2')">Click Me!</div>
        console.log(target);
        //otherParameter1
        console.log(other1);
        //otherParameter2
        console.log(other2);

        alert("Hello Nuclear!");
    },
    render:function(){
        return'<div onclick="clickHandler(event,this,\'otherParameter1\',\'otherParameter2\')">Click Me!</div>'
    }
})

newEventDemo({seen:true},"body");
条件判断
varConditionDemo=Nuclear.create({
    render:function(){
        return'{{#seen}}\
                    <div>\
                        you can see me\
                    </div>\
                {{/seen}}\
                {{^seen}}\
                    <div>\
                        yan can not see me\
                    </div>\
                {{/seen}}'
    }
})

varcd=newConditionDemo({seen:true},"body");

setTimeout(function(){
    cd.option.seen=false;
},2000);
2秒后改变seen,dom会自动变更。
循环
varLoopDemo=Nuclear.create({
    render:function(){
        return'<ul>{{#list}}<li>姓名:{{name}} 年龄:{{age}}</li>{{/list}}</ul>'
    }
})

varld=newLoopDemo({
    list:[
        {name:"dntzhang",age:18},
        {name:"vorshen",age:17}
    ]
},"body");

setTimeout(function(){
    //增加
    ld.option.list.push({name:"lisi",age:38});
},1000);

setTimeout(function(){
    //修改
    ld.option.list[0].age=19;
},2000);

setTimeout(function(){
    //移除
    ld.option.list.splice(0,1);
},3000);
Array的变更也能监听到,能够自动触发Dom的变更。
局部CSS
<body>

    <div>I'motherdiv!!mycolorisnotred!!</div>

    <script src="../dist/nuclear.js"></script>

    <script type="text/javascript">
        varScopedCSSDemo=Nuclear.create({
            clickHandler:function(){
                alert("my color is red!");
            },
            render:function(){
                return'<div onclick="clickHandler()">my color is red!</div>'
            },
            style:function(){
                return'div { cursor:pointer; color:red }';
            }
        })
        //第三个参数true代表 增量(increment)到body里,而非替换(replace)body里的
        newScopedCSSDemo({seen:true},"body",true);

    </script>

</body>
组件外的div不会被组件内的CSS污染。
讨厌反斜杠?
讨厌反斜杠可以使用 ES20XX template literals、或者split to js、css和html文件然后通过构建组装使用。也可以用template标签或者textare存放模板。
<template id="myTemplate">
    <style>
        h3 {
            color:red;
        }

        button {
            color:green;
        }
    </style>

    <div>
        <div>
            <h3>TODO</h3>
            <ul>{{#items}}<li>{{.}}</li>{{/items}}</ul>
            <form onsubmit="add(event)">
                <input nc-id="textBox"value="{{inputValue}}"type="text">
                <button>Add#{{items.length}}</button>
            </form>
        </div>
    </div>
</template>

<script>
    varTodoApp=Nuclear.create({
        install:function(){
            this.todoTpl=document.querySelector("#myTemplate").innerHTML;
        },
        add:function(evt){
            evt.preventDefault();
            this.inputValue="";
            this.option.items.push(this.textBox.value);
        },
        render:function(){
            returnthis.todoTpl;
        }
    });

    newTodoApp({inputValue:"",items:[]},"body");

</script>
组件嵌套
<script>
    varTodoList=Nuclear.create({
        render:function(){
            return'<ul> {{#items}} <li>{{.}}</li> {{/items}}</ul>';
        }
    });

</script>

<script>
    varTodoTitle=Nuclear.create({
        render:function(){
            return'<h3>{{title}}</h3>';
        }
    });
</script>

<script>

    varTodoApp=Nuclear.create({
        install:function(){
            //pass options to children
            this.childrenOptions=[{title:"Todo"},{items:[]}];
            this.length=0;
        },
        add:function(evt){
            evt.preventDefault();

            //this.nulcearChildren[1].option.items.push(this.textBox.value);
            //or
            this.list.option.items.push(this.textBox.value);

            this.length=this.list.option.items.length;
            this.textBox.value="";
        },
        render:function(){
            //or  any_namespace.xx.xxx.TodoList 对应的 nc-constructor="any_namespace.xx.xxx.TodoList"
            return'<div>\
                        <child nc-constructor="TodoTitle"></child>\
                        <child nc-constructor="TodoList"  nc-name="list"></child>\
                        <form onsubmit="add(event)" >\
                          <input nc-id="textBox" value="{{inputValue}}" type="text"  />\
                          <button>Add #'+this.length+'</button>\
                         </form>\
                   </div>';
        }
    });

    newTodoApp({inputValue:""},"body");
</script>
通过在父对象的install里设置this.childrenOptions来把option传给子节点。
服务器端渲染
functiontodo(Nuclear,server){
    varTodo=Nuclear.create({
        add:function(evt){
            evt.preventDefault();
            this.option.items.push(this.textBox.value);
        },
        render:function(){
            return`<div>
                      <h3>TODO</h3>
                      <ul>{{#items}}<li>{{.}}</li> {{/items}}</ul>
                      <form onsubmit="add(event)">
                          <input nc-id="textBox"type="text"  value=""/>
                          <button>Add#{{items.length}}</button>
                      </form>
                    </div>`;
        },
        style:function(){
            return`h3{color:red;}
                   button{color:green;}`;
        }
    },{
        server:server
    });
    returnTodo;
}

if(typeofmodule==="object"&&typeofmodule.exports==="object"){
    module.exports=  todo;
}else{
    this.todo=todo;
}
通过第二个参数server来决定是服务器端渲染还是客户端渲染。server使用的代码也很简单:
varkoa=require('koa');
varserve=require('koa-static');
varrouter=require('koa-route');
varapp=koa();
varjsdom=require('jsdom');
varNuclear=require("alloynuclear")(jsdom.jsdom().defaultView);

varTodo=require('./component/todo')(Nuclear,true);


app.use(serve(__dirname+'/component'));

app.use(router.get('/todos',function*(){
    var  str=require('fs').readFileSync(__dirname+'/view/index.html','utf8');
    vartodo=newTodo({items:["Nuclear2","koa",'ejs']});
    this.body=Nuclear.Tpl.render(str,{
        todo:  todo.HTML
    });
    Nuclear.destroy(todo);
}));


app.listen(3000);
浏览器端使用的代码:
<!DOCTYPEhtml>
<html>
<head>
</head>
<body>
{{{todo}}}

<script src="./nuclear.js"></script>
<script src="./todo.js"></script>
<script>
    newtodo(Nuclear)('body');
</script>
</body>
</html>
这样,组件的代码不需要任何变更就可以在server和client同时使用。
Nuclear如何做到同构的?
内置三条管线如下所示:

比如一般前后端分离的开发方式,仅仅会走中间那条管线。而同构的管线如下所示:
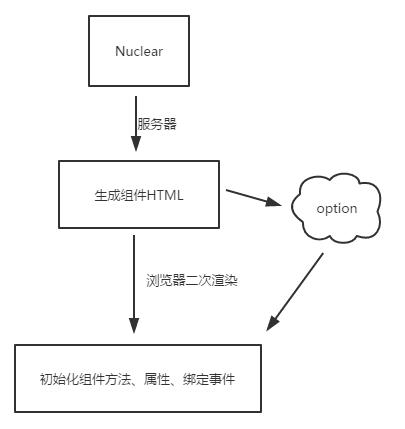
这里前后后端会共用option,所以不仅仅需要直出HTML,option也会一并支持给前端用来二次渲染初始一些东西。
Nuclear优势
1.节约流量
2.提升用户体验
3.加载更加灵活
4.Dom查找几乎绝迹
5.搭积木一样写页面
6.提升代码复用性
7.可插拔的模板引擎
8.Lazy CSS首屏更轻松
9.Nuclear文件大小6KB (gzip)
10.零行代码修改无缝切到同构直出
…
…