iOS如何用代码控制以不同屏幕方向打开新页面?
代码示例:https://github.com/johnlui/Swift-On-iOS/tree/master/ControlOrientation/ControlOrientation
环境要求:Xcode 7 / Swift2.0
前两天遇到了一个 “使用指定的不同屏幕方向打开新页面” 的需求,需求很简单:APP 一直保持竖屏,要求新打开的页面能够指定为横屏或竖屏,并且不允许自动切换,新页面退出后要恢复竖屏。
准备工作
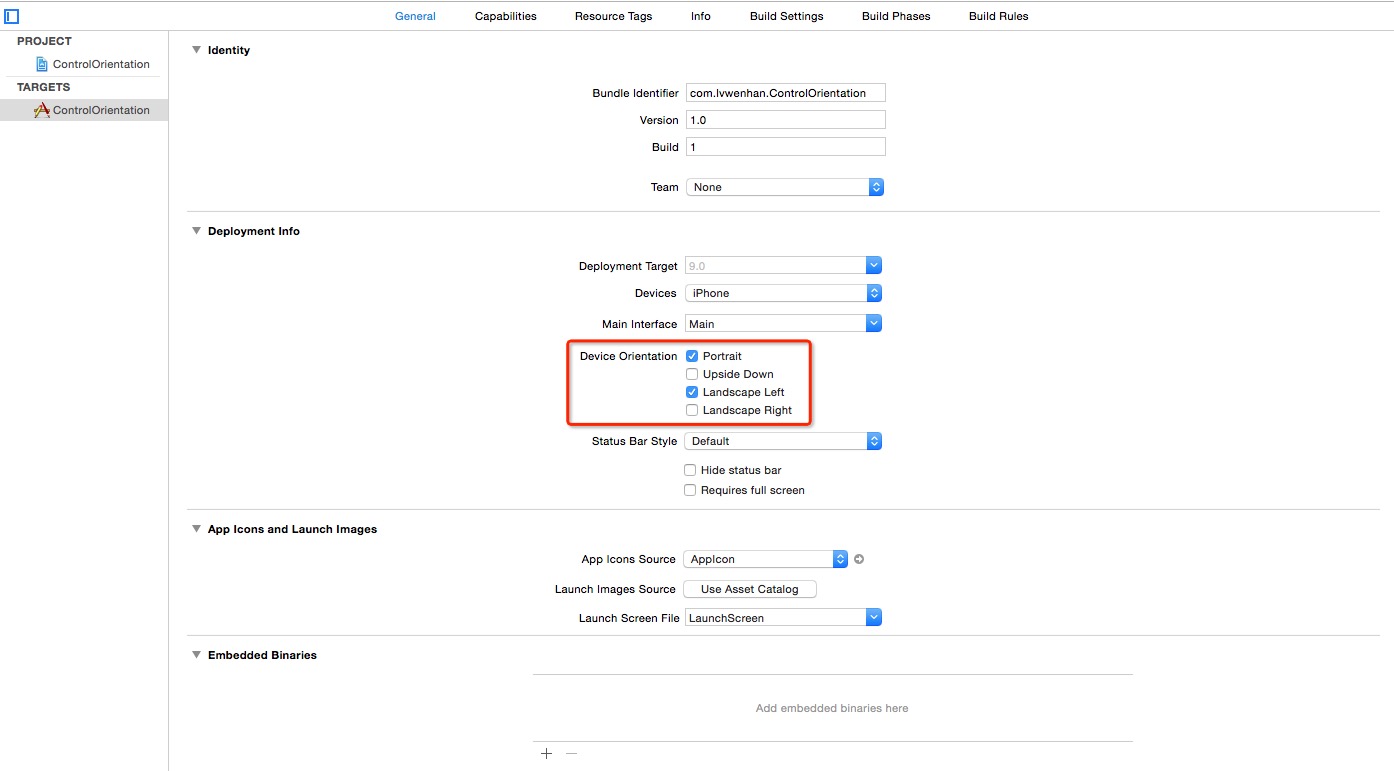
新建一个单页面项目,命名为 ControlOrientation。接下来取消 Landscape Right 的勾选,我们的 APP 将只支持 竖屏(Portrait)和 Landscape Left:

以横屏打开新页面
给 Main.storyboard 拖入一个 View Controller,新建一个继承自 UIViewController 的类,名为 SecondViewController,然后将两者绑定。之后给新建的这个 View Controller 赋予 StoryBoard ID 值 “secondVC”:
简单 Google 便可以得到代码方式指定横屏打来新页面的方式:
在新页面的 viewDidLoad 中执行:
UIDevice.currentDevice().setValue(UIInterfaceOrientation.LandscapeLeft.rawValue, forKey: "orientation")
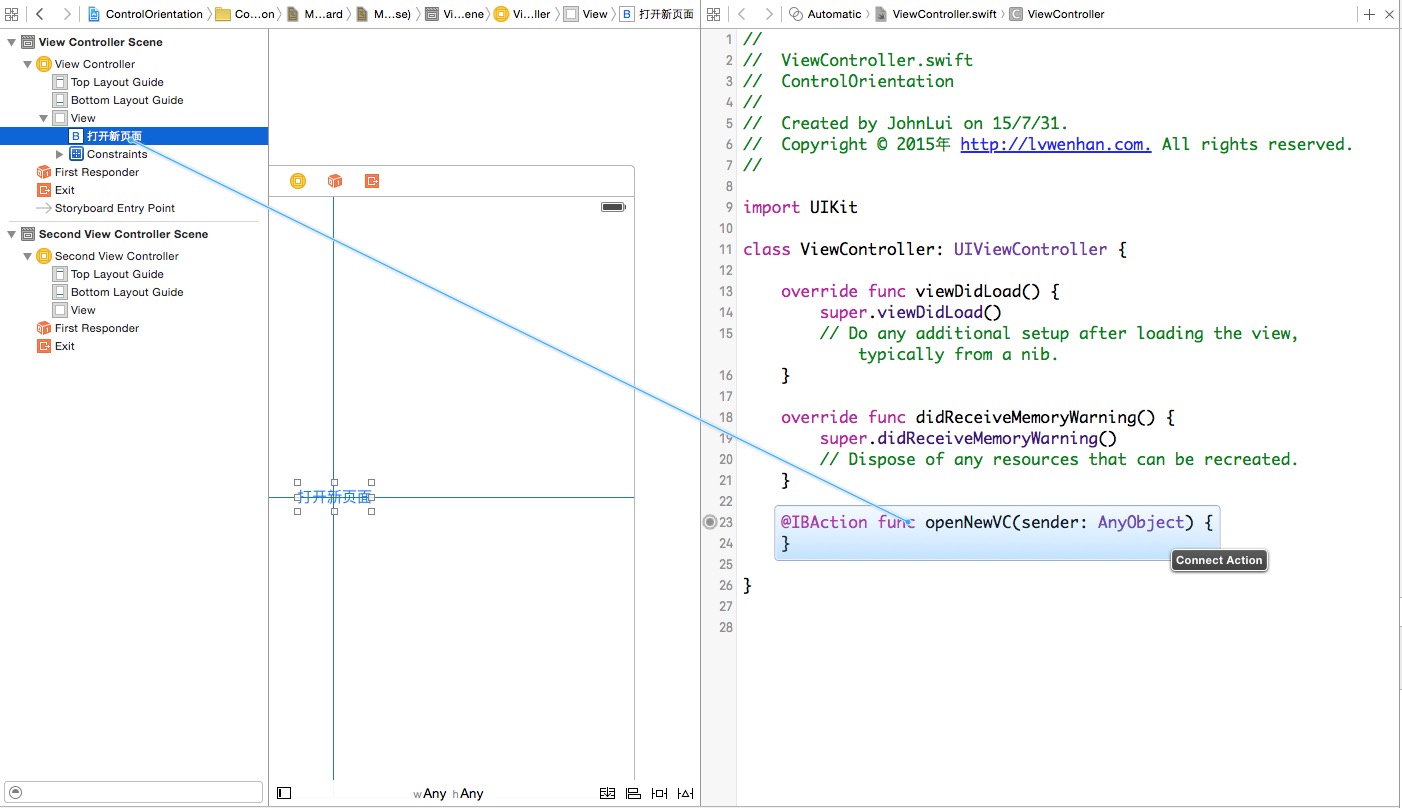
在启动页中间添加一个居中的按钮,拖动绑定点击事件,加入载入新页面的代码:

@IBAction func openNewVC(sender: AnyObject) {
    if let vc = UIStoryboard(name: "Main", bundle: nil).instantiateViewControllerWithIdentifier("secondVC") as? SecondViewController {
        self.presentViewController(vc, animated: true, completion: nil)
    }
}
运行!查看效果:
![]()
代码控制横屏成功!
还有一个收尾工作:给 SecondViewController 增加一个退出按钮,这一步就不再描述啦。然后再次运行项目,查看效果:
![]()
出来之后也变横屏了哎,这不是我们想要的。
屏幕方向锁定
重读文章开头的需求,我们就会发现需求要求我们在任何一个界面都不能因为手机物理方向的变化而自动改变屏幕方向,稍微 Google 一下,我们就会得到锁死屏幕方向的代码:
给 ViewController 和 SecondViewController 都增加一个函数:
override func shouldAutorotate() -> Bool {
    return false
}
为了直观的给大家展示,我们将通过手动改变模拟器的方向来模拟真机屏幕方向的变化(改变模拟器屏幕方向的快捷键是 Command 加左或者右),检验效果:
![]()
简直完美呀!是不是觉得有点太简单了?这么容易就实现了?当然不是,这么容易我还写个毛的文章呀。
神级 BUG
既然新打开横屏已经完美解决了,那么新打开竖屏怎么样呢?让我们把那一行切换屏幕方向的代码注释掉,运行查看结果:
![]()
BUG 了!!
解决 BUG
这个 bug 我搞了两天,虽然不是一直在搞它,但是总时长也至少有八个小时。其实严格意义上来讲,这并不是 bug,这只是我们不知道怎么才能搞定而已。最后我终于搞明白了这个 BUG 背后的运行原理,先说解决方案:
竖屏解决方案
在第一个页面 ViewController 中增加以下两个函数:
override func supportedInterfaceOrientations() -> UIInterfaceOrientationMask {
    return UIInterfaceOrientationMask.Portrait
}
override func preferredInterfaceOrientationForPresentation() -> UIInterfaceOrientation {
    return UIInterfaceOrientation.Portrait
}
在第二个页面 SecondViewController 中增加两个函数:
override func supportedInterfaceOrientations() -> UIInterfaceOrientationMask {
    return UIInterfaceOrientationMask.Portrait
}
override func preferredInterfaceOrientationForPresentation() -> UIInterfaceOrientation {
    return UIInterfaceOrientation.Portrait
}
查看效果:
![]()
竖屏搞定!
横屏解决方案
将 SecondViewController 中的函数改为:
override func supportedInterfaceOrientations() -> UIInterfaceOrientationMask {
    return UIInterfaceOrientationMask.All
}
override func preferredInterfaceOrientationForPresentation() -> UIInterfaceOrientation {
    return UIInterfaceOrientation.LandscapeLeft
}
别忘了打开 viewDidLoad 函数中的横屏控制代码哦。查看效果:
![]()
横屏搞定!
全搞定了吗?并没有
我们还是 Too Young Too Simple,在我们简陋的例子中,似乎确实已经全搞定了,但是实际工程中大多数项目都不是普通 View Controller 作为根控制器哦~
我们测试一下 QQ、微信、微博 等 APP 采用的通用方案:根控制器为 TabBarController,之后嵌套 NavigationController,然后放入 ViewController 页面进行展示,然后 present 出 SecondViewController。
搭 VIE TNV(TabbarController->NavigationController->ViewController) 架构
我们可不是跟风在国外上市的中国互联网公司拆 VIE 架构哦~
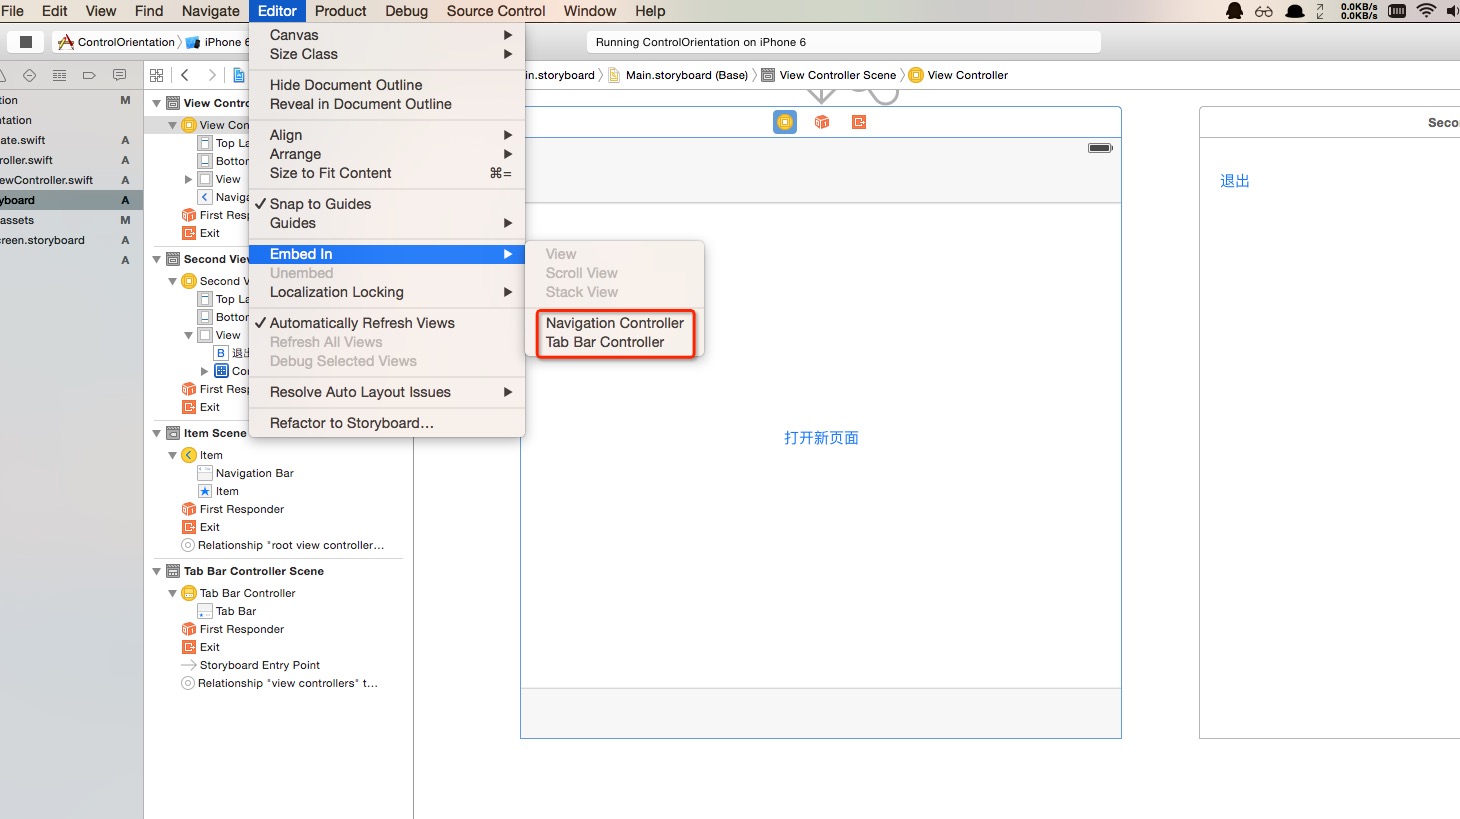
选中 ViewController,点击菜单中的 Editor -> Embed In -> Navigation Controller,第一层嵌套完成。
选中 NavigationController,点击菜单中的 Editor -> Embed In -> Tab Bar Controller,第二层嵌套完成。
如图:

查看效果:
![]()
这他妈什么玩意儿 o(╯□╰)o
终极解决方案
我埋坑的过程就不细说了,下面直接给出特性分析及解决方案:
特性分析
跟 shouldAutorotate() 不同,判断是否应该改变 APP 屏幕方向并不会检测当前显示的 View Controller 的属性,而是去检测根 View Controller 的属性,所以我们要从 TabBarController 一路获取到当前 View Controller。
解决方案
新建一个继承于 UITabBarController 的类,名为 TabBarController,将其和 StoryBoard 中的 Tab Bar Controller 页面绑定。该类完整代码如下:
import UIKit

class TabBarController: UITabBarController, UITabBarControllerDelegate {

    override func viewDidLoad() {
        super.viewDidLoad()
        self.delegate = self
    }

    override func didReceiveMemoryWarning() {
        super.didReceiveMemoryWarning()
    }

    override func shouldAutorotate() -> Bool {
        return false
    }
    func tabBarControllerSupportedInterfaceOrientations(tabBarController: UITabBarController) -> UIInterfaceOrientationMask {
        return self.selectedViewController!.supportedInterfaceOrientations()
    }
    func tabBarControllerPreferredInterfaceOrientationForPresentation() -> UIInterfaceOrientation {
        return self.selectedViewController!.preferredInterfaceOrientationForPresentation()
    }
}
同样,新建一个继承于 UINavigationController 的类,名为 NavigationController,将其和 StoryBoard 中的 Navigation Controller 页面绑定。向该类添加以下代码:
override func supportedInterfaceOrientations() -> UIInterfaceOrientationMask {
    return self.visibleViewController!.supportedInterfaceOrientations()
}
override func preferredInterfaceOrientationForPresentation() -> UIInterfaceOrientation {
    return self.visibleViewController!.preferredInterfaceOrientationForPresentation()
}
检查结果
![]()
写在最后
通过本文我们可以总结出以下两点:
是否自动转换屏幕方向由当前显示的 View Controller 决定。
是否支持横屏和是否优先选择横屏由 rootViewController 决定,若有多层结构嵌套,则需要层层专递,将控制权交给当前显示的页面。类似于 代理传值 和 延迟静态绑定。
另外,我利用 Swift 的 enum 给 SecondViewController 类加上了一个优雅的 横屏/竖屏 控制开关,具体代码可以在 Github 上查看。
扫一扫订阅我的微信号:IT技术博客大学习
- 作者:JohnLui 来源: 岁寒
- 标签: 屏幕方向
- 发布时间:2016-02-16 22:16:42
-
 [1145] WordPress插件开发 -- 在插件使用
 -
 [57] 解决 nginx 反向代理网页首尾出现神秘字
 -
 [53] Java开发岗位面试题归类汇总
 -
 [45] web开发设计人员不可不用的在线web工具和
 -
 [33] Rax 系列教程(长列表)
 -
 [33] 手机产品设计方向
 -
 [32] 一句话crontab实现防ssh暴力破解
 -
 [30] 如何建立合适的索引?
 -
 [28] 程序员疫苗:代码注入
 -
 [27] oracle技术方面的路线